Townscript is free to use. You can create an event at no cost and start accepting registrations for free. Our event creation process is designed as a DIY, user-friendly platform, enabling you to set up an attractive and engaging live event in just a few steps.
You can create events across various categories such as endurance, conferences, entertainment, travel, education, and adventure. Simply select “Create an Event” from the home page or your dashboard to begin setting up your event. We also offer robust customization options to help you maximize the impact of your event listing.
Note: If you are new to Townscript, click on “Create an Event” to begin the sign-up process and start creating your event
Steps to follow:
1. Login or sign-in to your Townscript dashboard(Sign-up if you are new to Townscript).

2. Click on the "Plus" button on the top right corner to create an event.

- Enter the event name.
- Select event visibility (Public is open to all and Private is invitation only).
- Select the start & end date.
- Hit the submit button.
3. Enter the venue for your event.

- Enter your address and select from google shown results or manually.

4. Add a description for your event.

- Add important information about your event in the description.
Note: Event tags are automated and based on your event location, event type, event topic, and event sub-topic. You can't edit or add additional tags for your event.
Tips: Go to Add description to your event to write an effective event description.
5. Add cover images to your event in both laptop and movie views.

- Add cropped images of size asked.
Note: Any images you use must be yours and engaging.
6. Add Tickets to your event.
- Click on "Add Ticket"

- Enter the ticket name.
- Add quantity and Maximum and minimum limits.
- Enter the ticket price.

Click on “Show advanced settings”
Manage Townscript & Payment gateways fee(Fourth row in add a new ticket page).
- Select "Me" if you want to pay the Townscript fee and Select "Buyer" if you want to charge from the buyer.
- Select the Payment gateway fee in the same way.

- Select start date & end date for tickets.
- Enter the ticket description(That will look below your ticket name).
- Enter the message for attendees (It will receive to attendee when they book tickets).
- Click on save button
You can see your added ticket in the ticket section of the event as below.

If your ticket involves GST, click on “Yes”, if not click on “No” and submit.
Note: Once you sell a paid ticket, you won't be able to change the price of that ticket type. However, you can hide the ticket and then create a new paid ticket at the new price.
7. Add questions to the organizer's form.

- Here, you will see two mandatory questions.
- Click on add new question at the bottom.
- You will see a set of predefined questions.
- Select your desired question
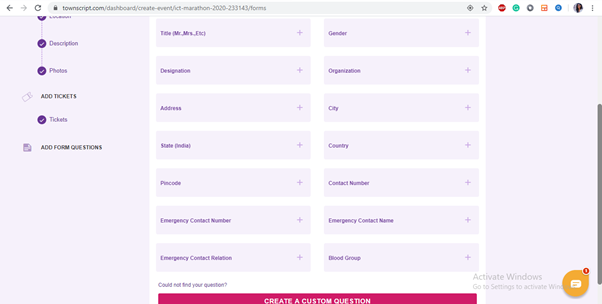
- Select the ticket type where you want to add the new question(Questions in only asked when the only particular ticket type is added to buy ).
- Choose it is optional or mandatory.
- Click on "Add Question" button.

- If the desired question is not mentioned in the predefined list, click on "Create a custom question."

- Fill question title.
- Select question type(Text, paragraph, number, checkbox, multiple-choice date and all).
- Select the ticket type where you want to add the new question(Questions in only asked when the only particular ticket type is added to buy ).
- Choose it is optional or mandatory.
- Click on the "Add Question" button.
Question is successfully added to attendee form, You can check on the form tab of your event.
And Your event is created successfully.
Tip: Don't forget to make your event live by enabling the radio button on your dashboard.
Note: By default, your event will process payments with Townscript Payment Processing. If you want to use PayPal, make sure to set this up before your first ticket sale!